Contributing to the project
a (hopefully unfortunately not so) simple and straightforward guide
General guidelines for submitting your recordings: – Updated on 01/11/2022 (new stuff will be in blue)
TL;DR
- Start with your Mega Drive Volume slider maxed
- (If you have an audio interface with recording volume control) Find the unitary gain
- Record the game at 96khz 24bit and see if you’ve clipped. If you’ve clipped, lower the volume on the Mega Drive and re-record the entire thing, not just the single track.
- Tag your files properly and add the info.txt and cover/youtube picture to your release
- Record 10 seconds of silence and add that to the release or send us an MDFourier test recording
- Go through the Long version below to make sure you’ve done everything properly
- Zip everything up, upload it somewhere and give us the link via forum, Facebook or Twitter
- Thanks! :-D
Long version:
- Only Mega Drive/Genesis soundtracks (for now)
- Exceptions to the above rule might apply depending on the case
- Complete soundtracks only, no single tracks. Jingles and tracks shorter than 10 seconds can be omitted. Unused/hidden/beta tracks are welcome but not required
- The Mega Drive audio circuitry must be stock (no CCA/triple bypass/whatever, with only one notable exception – read on)
- Pure 96Khz 24bit rips (no 192Khz or 32bit recordings dithered down to 96/24) encoded in FLAC at level 8 compression.
- All files must have the following tags (Year = when the game was first released; Album Artist = all the artists mentioned in the tracks):
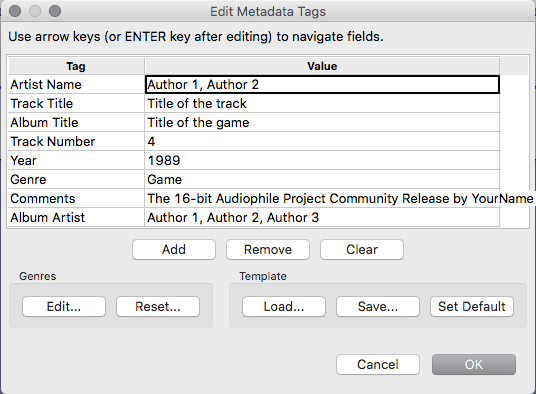
- File names must adhere to the following convention:
track number in double digit numbers followed by a space, dash, space and track name (example: 01 – Track name.flac) - Absolutely no special characters in the file name, just plain a-z and 0-9 characters. Dashes and parentheses are acceptable if really needed. This means that characters such as commas, dots, exclamation points, apostrophes or others are not allowed in the file name (but you can put whatever you want in the meta tags)
- You must provide the album art with a resolution of 1000×1000 pixels in JPG format which must adhere to our template (more on that later). You must not embed the album art in the files. We’ll take care of that along with converting to FLAC CD and MP3 format.
- You must provide the following information written into a plain text file (.txt) along with your recording:
- • Your nickname (no real names)
- • Exact Mega Drive/Genesis model (example: JAP Mega Drive VA0)
- • Mods you’ve done to the console, if any (example: recapped, improved power supply, etc…)
- • Playback method (example: Game’s Sound Test, 16bap VGM Player, etc…)
- • Recording Audio Interface (examples: A – Sound Blaster Audigy ZS PCI Soundcard. B – XXXXX motherboard integrated soundcard with ALC662 DAC. C – Focusrite Scarlett 2i2 USB)
- • [Optional] Operating System used (example: Windows 10, Windows 7, Mac OS High Sierra, Ubuntu Linux – please specify kernel used)
- • [Optional] Software used to do the recording (example: Audacity, Adobe Audition, etc…)
- You can download the .txt file template by clicking here.
Restrictions:
Acceptable Mega Drive Genesis Models:
Only Mega Drive Model 1s are accepted (the large ones).
- US: VA2*, VA3, VA4, VA5, VA6, VA6.5, VA6.8
- JAP: VA0*, VA1*, VA2*, VA3, VA4, VA5, VA6, VA6.8
- EU: all, up to VA6.8, but only for PAL games (read on…)
* = those consoles need a small modification documented here (credits to dogman91 for the clear picture). My own modification here. Make sure to use high quality parts. Once modded, those will yield the best possible sound out of a Mega Drive.
An important note about PAL games:
We now know that there are some games which should be explicitly recorded from a PAL console at 50Hz. A possibly incomplete and tentative list is available here.
Please note that you’ll have to find out whether the VGM has been correctly ripped at 50Hz or 60Hz in the first place.
If the game has been ripped a long time ago (2021 and earlier) then it will have surely been ripped at 60Hz and, as a consequence, it must be played back on a 60Hz console.
Background noise:
Insert a game/flash cartridge in your Mega Drive, turn it on and get to a part where there’s absolutely no sound or music playing. No video cable must be connected to the console.
Record 10 seconds of silence and watch how loud is the background noise.
On a 24-bit scale, if it’s -60dB or less you’re ok.
-57dB is acceptable.
At -55dB it will start getting noticeable and anything more won’t be acceptable.
You must send this 10 seconds silence file to me for inspection along with the other tracks, or an MDFourier test recording (I’ll talk about this later). No exceptions. If you don’t, your contribution will get rejected.
Pro-tip: When recording, make sure to try isolating the console as much as possible from anything else. No video cables connected and try putting the console away from potential sources of interference (examples: PCs, monitors, mobile phones, etc…).
Always use shielded cables.
Recording rules:
- Do not clip
- Do not clip
- Do not clip
- Did I already say “do not clip”?
- Really, do not clip
- Don’t you dare compress to avoid clipping
- And don’t even try de-clipping
- So, do not clip
So, what’s the big deal about clipping? Clipping means you’re sending a signal to the recording interface which is too strong thus overloading the circuitry and leading to bad distortion. You *MUST* avoid this at all costs and the solution is simple: lower the source volume.
You’ll be recording from the headphone jack, which means you’ll have a handy volume slider. You’ll always want this set to max volume, but if you’re clipping, slide it slowly down until it doesn’t clip anymore.
If you use Audacity, you’ll clearly see clipping because there’ll be a red bar.
Sometimes there will be a very brief spike on inaudible sounds which may clip. Those are the only exceptions and are ok.
To put it short, this is acceptable:

This is not:

And, as a good practice, always leave some headroom in your recordings. Volume knobs exist for a reason.
I’m giving this tip because when we’re downsampling 96Khz 24bit to CD quality at 44.1Khz 16bit, we’re reducing the dynamic range available and tracks which are very near the clipping point might clip at the lower sampling. Not a big deal because this is all handled by the converter during the process, but it’s always good use to leave just that tiny bit of headroom free.
Other recording rules:
- If the track loop is longer than 2 minutes, make it loop only once
- If the track loop is shorter than 2 minutes, make it loop twice
- If the track loop is shorter than 30 seconds, make it loop three times
- If the track isn’t meant to loop, do not loop it, even if it’s very short
- If the track loops, always add fade out and add 1 second of silence after fadeout
- Do not normalize the tracks. If there are some tracks which are very quiet and another one which is too loud (ie: it clips) then slightly lower the volume until the loudest track doesn’t clip anymore and leave the volume the same for all the other ones.
- If you find out that all the tracks are too quiet, do not amplify them in software, record them again from scratch with the right amount of volume. Same applies if you find out that you’ve clipped.
- In other, simpler words: find the highest volume settings you can use without clipping and stick to it for the entire game soundtrack.
- Do not, under any circumstances, amplify the signal in any way. This means that if you have the volume slider already at max on your Mega Drive and the track is still quiet, do not use your recording interface’s controls to amplify it. Find the unitary gain (more on that later) and stick to it.
- And while we’re at it, do not clip.
Further recording instructions:
There are all kind of recording interfaces out there, but we can separate those between two big and very important categories: those which have a volume control and those which don’t.
- Recording interfaces with recording volume control:
Without getting too technical, those might have a simple attenuator (such as a resistive potentiometer) or an operational amplifier which will let you boost or lower the volume. In this case, you need to find the unitary gain setting of your recording interface (read on) and leave it at that and lower the Mega Drive volume to avoid clipping. - Recording interfaces without recording volume control:
Contrary to common logic, those are the ones I’d recommend because they have less circuitry involved and your recording will be more accurate and less “colored”. In this case you have no choice but lower the Mega Drive volume slider to avoid clipping.
Even further recording notes (this one’s very important), AKA “Unitary Gain” *NEW*
*This applies ONLY to those who have recording interfaces which have a recording volume control*
In order to make all the various recordings consistent volume wise, it’s important that we all use the same amount of gain while recording: the unitary gain.
What “unitary gain” means, basically, is that no gain is applied or, to put it in different words, that no amplification is supplied to the Mega Drive original signal.
In order to find out what the unitary gain of your recording interface is, you’ll have to run a very simple test: run the 240p Test suite Audio test (Main menu -> Audio Tests -> Sound Test -> choose YM2612 -> 1 -> press A on your controller), record it and compare it with our own recording (which you can download by clicking here): when the levels are matched (that is, they sound with the same volume) you’ve found out the unitary gain of your audio interface and you’re good to go.
To make sure the levels are matched, you can open the file in Audacity, select the audio and go to Analyze -> Plot Spectrum and see what the highest value is. Ours is a little north of -16dB.
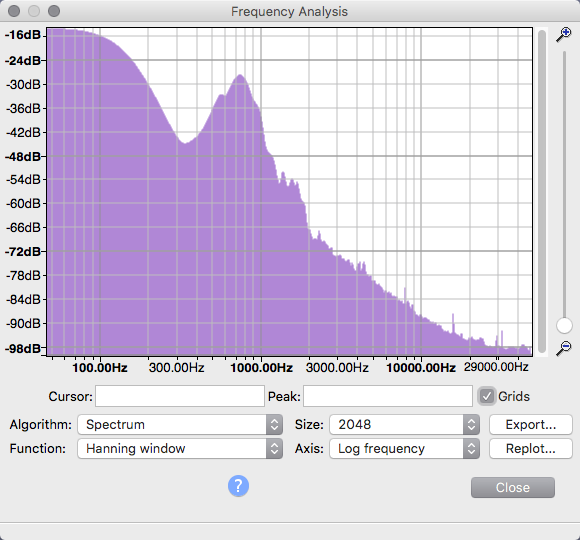
Remember: once you’ve found the unitary gain on your audio interface do not touch that ever again. If the track is quiet, leave it quiet. If it clips, lower the volume on the Mega Drive.
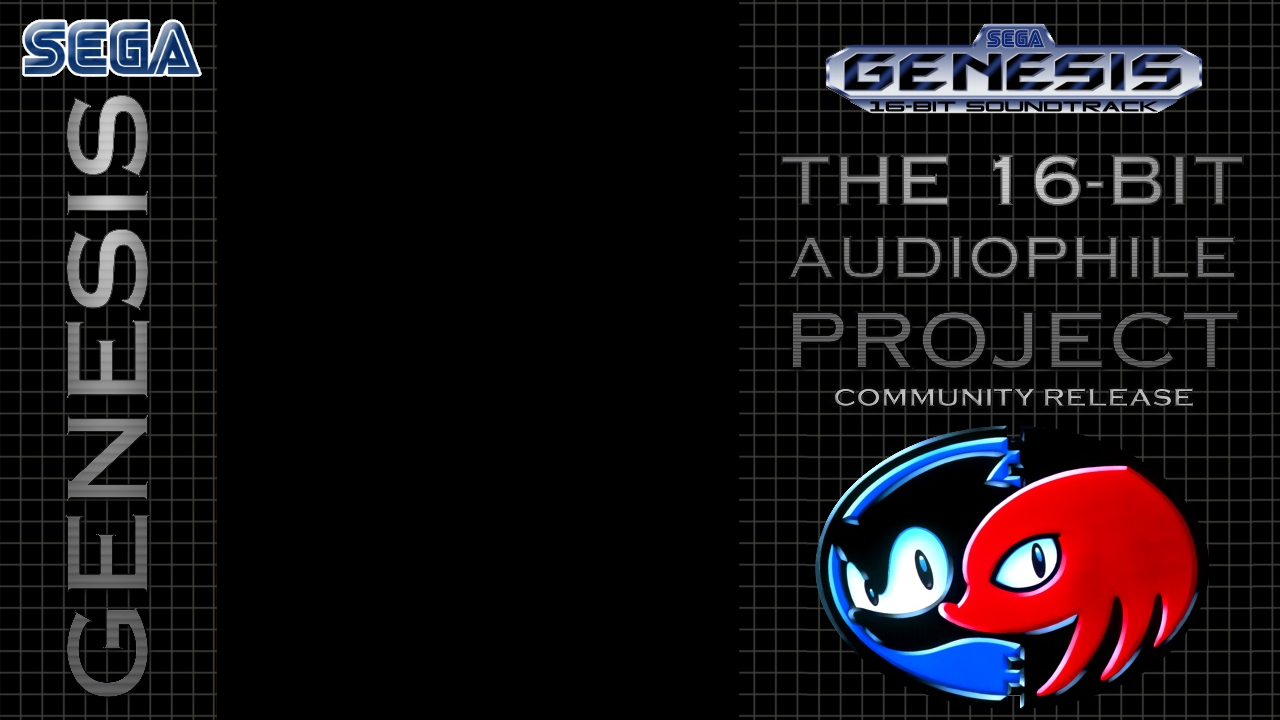
Album art:
Here’s the template you’ll be using: just paste the cover onto it so that it blends well and you’re good to go. If you want, feel free to add your own name/nickname somewhere on the cover, just do not make it huge (look at the “Community Release” font, do not make it any bigger than that, please) and try putting it into the upper right or lower right corner.

And the template for our Youtube Channel:
You can find high quality covers here.
VGM Player: (*NEW* VGM Player, please update!)
This is the software we’ve been using to play back all the music natively on the Mega Drive and without video interference: VGM_Play
This is a modified version of Deadfish Shitware fantastic VGM_Play which was done exclusively for us to attain perfect timing, along with the ability to completely disable the VDP (Video Display Processor) to greatly lower the noise floor.
The usage is pretty simple: it’s a windows software you unpack with WinRAR, start VGM_Play.exe, select Rom Builder, Add Tracks (which will open an explorer window where you can select vgm/vgz files) and then Build Rom and you’ll have a VGM_Play.bin file in the same folder which is the ROM you’ll have to put into your flashcart. DO NOT CHANGE ANY OPTION.
Please, use only vgmrips.net VGMs as those are the most accurate ones.
During playback you can press Down on your control pad to completely disable the VDP. This will greatly reduce the noise in the recording but you’re going to lose any video capability (ie: screen will be black). We strongly recommend you to do this. You can turn the VDP back on at any time by pressing Up on your control pad. Please note that turning the VDP on or off will restart the playback of the current track. While the VDP is off you can still use all of the VGM Player functions such as stopping the track, restarting it, going to the next one, previous one, etc…
Having no video capabilities should pose no issue anyway since you should always record headless (ie: without the Mega Drive connected to a TV/Monitor).
If you want to rip the music straight from the game cart that’s ok as well, but you WILL have much more noise due to the VDP being active and working.
[NEW – 20/08/2022] New adjusted Deadfish VGM Player *ONLY* for VGMs ripped with blast’em
It’s been one year that the emulator blast’em has implemented a new VGM logger which has solved the timing issue (among many others) that VGMs ripped with KEGA had, which means that now we have the opportunity to make rips even more accurate time wise.
The only problem is that there’s really no way to tell if a VGM has been ripped with KEGA or blast’em apart from its release date.
If the VGM release date is older than 1 year, it was surely made with KEGA, otherwise it is almost certainly made with blast’em.
So here’s the rundown of what you should be doing:
• If you’re unsure whether the VGM has been ripped with KEGA or blast’em, just use the Deadfish VGM Player you’ve already been using up to now
• If you’re 100% sure that the VGM has been ripped with blast’em, use this adjusted version of Deadfish VGM player: download adjusted version
By using the adjusted Deadfish VGM Player in conjunction with VGMs ripped by blast’em, you’ll be able to reduce the timing issues further and get as close as we are now.
[NEW – 01/11/2022] New adjusted Deadfish VGM Player *ONLY* for VGMs of PAL games ripped with blast’em
If you are absolutely certain that the VGM you’re playing is meant to be played on a 50Hz PAL console and you know for sure that the VGM has been ripped correctly at 50Hz with blast’em (VGMs ripped only from 01/11/2022 onwards) then you must use this adjusted version to get correct timing: <Coming soon>
[OPTIONAL] MDFourier analysis
This is a completely optional step, but a very welcome one: along with the VGM Player download, you’ll find a VGM file which is the MDFourier test kindly provided by FirebrandX. You can add that VGM file to the other ones you want to record and send it to me. The results will be published along with the contributions you’ll send in.
You can also do the test yourself by grabbing MDFourier from its website.
I’ve made an experimental macOS version myself you can download here. Bugs may happen.
Here’s a link with our test recording so you can download it and compare it yours.
The MDFourier recording must be done at 48khz 16bit. No conversions (ie: 96khz 24-bit to 48khz 16-bit).
Phew, that should be all!
This guide will be probably updated over time so make sure to keep checking it from time to time.
Also, please note that as of 01/11/2022 we don’t have anyone checking the tracks, so make sure that you’ve done things properly.